Showing posts with label Craft Fair Series. Show all posts

Sep 22, 2018

Craft Fair Series 2018 + Bookmarks

So last year I did bookmarks as a way to use up my paper stash. See that post here : Craft Fair Series 2017 + Bookmarks. I think I ran out of ideas and I didn't love all the ones I did. So this year I decided to remake some of them. Let's take a look:
Here's the deets: These have been hand painted. I love em'! I painted an 8 1/2 x 11 sheet of photo paper with acrylic paint. When dry I secured the photo paper to a piece of card stock and then cut into 2x6 rectangles to fit in my sleeves. Let's take a look at a few from last year with packaging:
Bookmark Packaging Ideas
All you need are your basic supplies for card making, a sleeve and tassel, and ta-done. You can find the sleeves available in the Charm Shop. For the packaging I used a 2x8 self sealing cello bag and a 2 1/4 x 1 inch strip of designer paper (scored at 1/2) folded over the top. I don't know if I love the topper but the bag was definitely necessary, otherwise that tassel went everywhere before I could get it to the show.
Enjoy!
~Sherry

Sep 16, 2018

Craft Fair Series 2018 + Popcorn Sleeve Tutorial

The craft fair series continues with another top seller from 2017. I do two versions of these, today I am sharing the sleeve topped with gloves. Super cute, let's take a look:
Here's what you will need:
  • A Pair of Gloves - I use both youth and adult sizes, I also prefer the soft fuzzy gloves.
  • Snowman Printable
  • Microwave Popcorn Bag - be careful here, I bought Orville Redenbacher and they were too large for the print to wrap around. So far the brand I have found that fits perfectly is PopWeaver. You will need a bag that measures appx. 3.5 in x 5.5 in (it is a 65g serving bag)
  • Sticky Strip (or similarly strong adhesive)
  • String
  • Ribbon and Embellishments
How it's done: Pick up your printable from the charm shop and print out the pdf, before I purchased a color printer I would send these over to Office Depot to be printed. Cut in half on the long side directly at 5.5 inches. Very lightly score on the short side at 2.25 inches and 6 inches (just enough to help form it around your popcorn bag). Wrap around your popcorn bag and secure with a strong tape, such as sticky strip. Put your hand inside one glove and then slip the second glove over the top (this is a useful gift, the receiver gets an entire pair). You will then take the pair and slide them over the top of the popcorn sleeve. Secure and tie off the top with string and then decorate as you wish with ribbons, tags, and embellishments. Here I used a wide wire ribbon, an 1/8 inch ribbon, and a bell.

What I learned: This was another one that I had to explain to every person that came to my table. They sold like hotcakes after I explained it, but this year I plan to put out a pair of gloves as part of the display to help identify what it is. I sold these for $5 all day long.

Let me know if you have any questions,
~Sherry

Sep 12, 2018

Craft Fair Series 2018 + Sock Cupcake Tutorial

Another top seller from last year were these super adorable sock cupcakes! They were such a cute stocking stuffer, what girl wouldn't want some super plush and cozy sockies for their feet? Let's take a look:
Spa Sock Cupcakes
Are these not just the cutest things ever? A few supplies from Walmart and Dollar Tree and you're good to go.
Spa Socks
Cozy Sock Cupcakes
Here's what you will need:
  • Treat Cups
  • Cozy Socks
  • A Sucker (or anything that will look like a cherry on top)
  • String
  • Gusseted Bottom Cellophane Treat Bag
  • Ribbon and Bow
  • A Cute Tag
  • Some Hot Glue
Lay the socks out flat and slightly offset them. Roll into shape. Just keep tucking and adjusting as you roll until you get into a shape you like. Tie some string about a half inch or so from the bottom to help it hold it's shape. Insert into the treat cup. Easy peasy.
Cozy Socks
Spa Sock Stocking Stuffer
Sock Cupcake
Push the sucker down the center. Depending on how thick your socks are, you may have to cut part of the stick off so that it sits down into the "frosting".
Spa Socks
Now just slip it into the bag. I tie off the bag top with some more white string (threaded through my tag of course) to secure it, and then I hot glue the ends of the string together to reinforce. Add your curly ribbon and bow, I hot glue the bow on as well so that it doesn't pop off during transport and set up. I get these mini bows in packs of 10 at Walmart when their Christmas stuff comes out.
Sock Cupcake Tutorial
Here's what worked: Like I said, these were another top seller last year. I completely sold out by the end of my first fair of the season and had to hurry to whip up some more. I sell these for $8. Not only are they a great stocking stuffer, but I also sold quite a few as teacher gifts. A word of advice: Put out a pair of the socks loose with the display so that it's easier for customers to figure out what they are. Everyone loved them, but only after I explained it a hundred times. Having a loose pair of socks should help with that. And bonus, they can touch and feel how awesome and soft the socks are. Let me know if you have any questions!

Happy crafting,
~Sherry

Sep 10, 2018

Craft Fair Series 2018 + Stamped Tiles

I have taken the summer off from cards to do some remodeling and work on more of the fine art and graphic design side of things. Fall is coming and it is time to start thinking about the craft fair season coming up quite quickly. So today begins the first post in this years craft fair series.

One of my top sellers last year were stamped travertine coasters (I just love the look of those imperfect tiles), so of course they will be back on my table this year.  Let's take a look at a few of my designs:
Travertine Tiles
Stamped Tiles
Travertine Coasters
Apparently they were so popular that the girl with the table next to me at the first craft fair (she was selling knitted goods) decided she wanted in on the action. The next month I'm setting up at another fair and she was positioned next to me again. Low and behold I look over and there are some knock offs of my coasters sitting on her table among the knitted items. Judging by her sales, and the looks of her finished product, she should have just asked me for instructions.

Here's what worked: So I know that every market is different but, for me, I sold these last year 1 for $5 or 4 for $15. Not one person purchased less than 4. Was that because the pricing made it appear that 4 was much more of a bargain? Or because no one really wanted to have just one? Even though no one purchased an entire set of the same design. Everyone wanted the option to mix and match. Initially I was going to only put out the pricing as pick 4 for $15 but I think I have talked myself out of it. I'm going to put the pricing the same and see how it goes. I also know which designs I sold out of so I will change up some of my designs this year and take out the less popular ones, as well as incorporate a few new designs.

I did really well on these last year but that doesn't mean they will be as popular this year, especially if more vendors in my market are doing them this year. Just in case, I decided to come up with a twist. Are you ready for it? Here it goes, I'm turning them into desk art:
Travertine Coasters
Now don't judge, this was just my test piece I used to get the placing figured out. I had a bunch of quarter round left over from when we got our floors done and was racking my brains trying to figure out a use for it. I decided to cut a piece off and see if I could use it as an easel backing on some tiles. In my craft studio I do use the travertine tiles, ceramic tiles, and even acrylic blocks with different mediums. I stamp on them, I paint on them, I do acrylic pours, resin, and alcohol ink. Having a simple way to turn flat tiles into desk art gives them a whole other use without having to mount them to expensive boxes or frames. Although I love the look of those as well, they don't necessarily fit into a kitschy craft fair.

Here are the deets: What I found worked best was a one inch section of the quarter round for these 4x4 tiles, if you are doing something larger you will need to adjust accordingly. I then spray painted it black but feel free to use any color you like. I will say that on my test piece I grabbed whatever was handy, it happened to be chalk paint. Don't do it lol, use something that is going to dry and not budge. No es bueno. Also important to note, you need to leave appx. a 3/16 inch of a gap at the bottom so that the piece will lean back slightly while not falling over one way or the other. If you do it flush it will never stand up. I attached this onto the back of my tile with e6000 glue. You need something strong, and permanent. It did take a little longer to dry than usual but I'm not sure if it was because of the chalk paint or because of the tile. I just left it overnight to dry and it was fine.
Desk Art
Stamped Tiles
In case you missed it: For doing these stamped tiles all you need is stazon ink. I simply clean off my tiles with alcohol, stamp my design with stazon, that is it. I have seen a lot of misinformation out there on these. You do not need to seal them, you do not need to bake them, you do not have to do anything else. You can buy stazon in many different colors these days so you can change up your designs that way (I happen to like the black). Travertine tiles (which I buy at Home Depot quite inexpensively) are very porous. When left in their natural state they act as thirsty stones, which is something that you want in a coaster. If you use any different type of ink and try to seal these bad boys they will no longer absorb water, instead the water will run off onto the table if your glass gets really sweaty. Don't forget to add some heavy duty felt feet or rubber bumpers (which you can also get at Home Depot) to the bottoms so that they are lifted from the table surface and won't scratch. Last year I used the felt because I liked the look of it but I will be switching over to the rubber bumpers. You will find that the felt slides quite quickly across a table top. Both will work for it's purpose, and the felt costs a little less. Oh, and I highly highly recommend buying from the pile of loose tiles instead of the packaged ones. That way you get all of them with character and yet still have a good stamping surface. Picking up more on short notice last year I decided not to pick through, now I have a few more "test" pieces laying around than I would like. Please feel free to let me know if you have any questions!

Keep it crafty,
~Sherry

Dec 11, 2017

Craft Fair Series 2017 Wrap Up + Prize Patrol

I have wrapped up my final show of the year. I haven't made a card in so long I feel out of sorts! I know I have been MIA for weeks between the shows and the holiday. Here are a couple pics from my final show.
Craft Fair
Craft Fair
It was a small show but I still made 4 times my table fee. My number one seller overall this year, hands down, was the popcorn sleeves. You can find the instructions here on my blog and you can also download the free printable here as well.
Free Printable
Free Printable
Free Printable
Since I have been so far behind I am going to wrap up the year with a really big Prize Patrol! Seven (yes 7) random subscribers to post a much appreciated comment below will be getting happy mail, let me know what kinds of projects you would like to see more of for 2018.

Please leave your comment by December 18, 2017 and make sure that you are also subscribed to the really awesome crafty news so that I can contact you.

Happy crafting!
-Sherry

Nov 12, 2017

Craft Fair Series 2017 + What I Learned

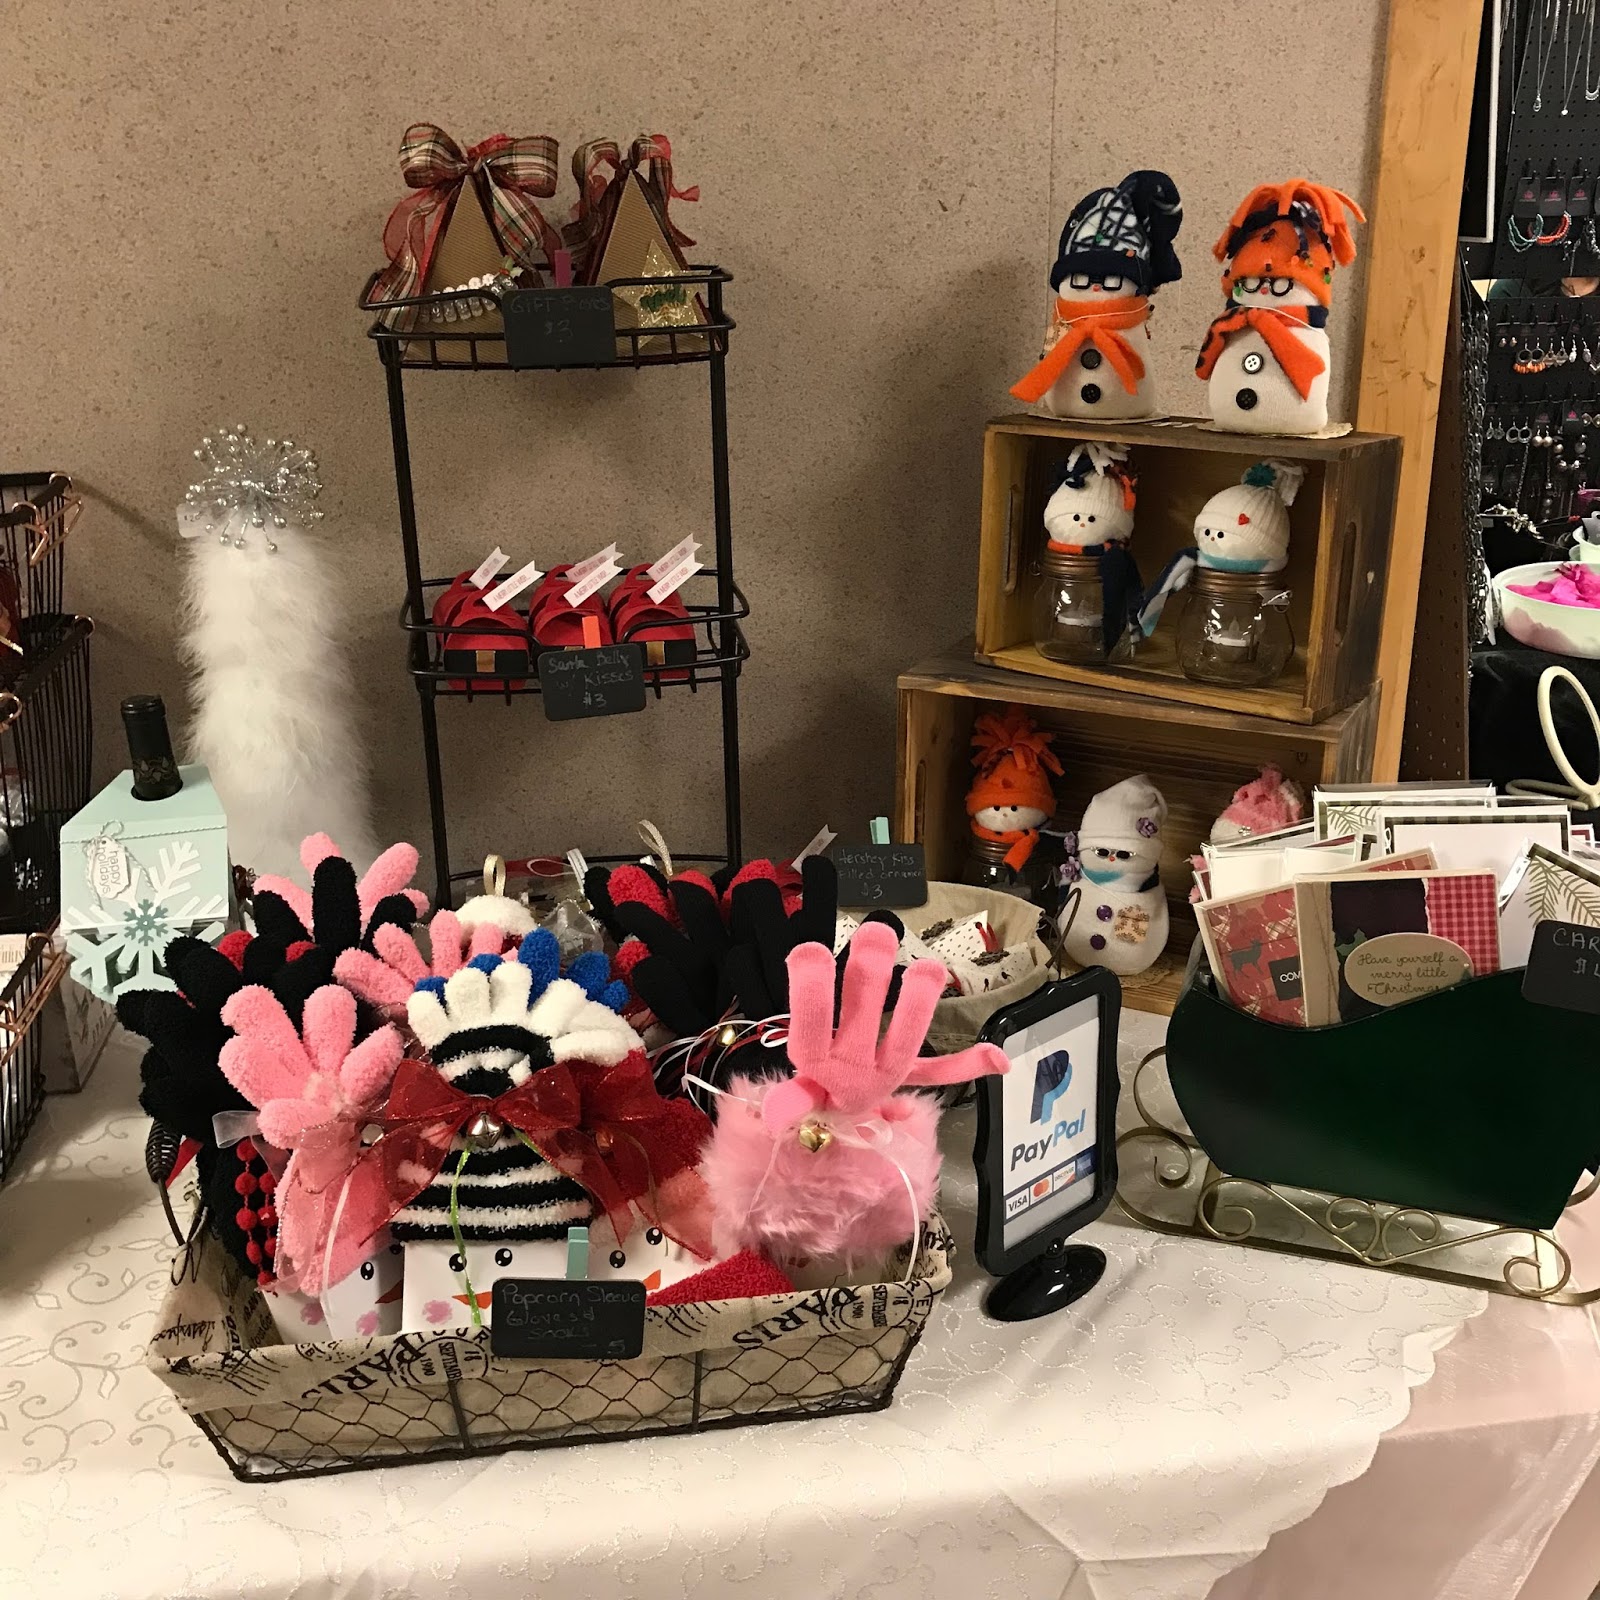
Whew, it was a long haul but we finally made it. Here is a look at my display:
I learned a few things during this process that I will share with you.

  • First of all, a pop up wagon would be a life saver if you are doing shows by yourself. Thank goodness I didn't do my show alone, especially the first time around not knowing what to expect. If I continue to do fairs I will be investing in one. When it was time to break down I watched experienced vendors move with lighting speed to breakdown and vacate. The ones who were most efficient had these wagons. They just loaded them up and off they went. I did bring a hand trolly which helped, especially since I wasn't the one wielding it, but I was little limited by it.
  • Location is key and you may have to fight for it. They put my booth space in this little offshoot hallway that was not in the line of traffic, it was set at least 6 feet behind all the other vendors, and my neighbors (who arrived before me) took the opportunity to extend their space by setting their tables up to go all the way around. Which for me meant that not only was it too far of a walk off the flow of traffic for people to make an effort to come to my table, but then they also would congregate at the end of my area blocking me from view as they visited the other vendors. My neighbor on the left even decided to park her chair at the end of my table (in my space) instead of inside her own. The girl to the right of me said to always ask for electrical wether you need it or not, it usually guarantees she's in a main walkway.
  • Arrive early. I knew it would be a long day, and I knew how much time I needed to set up, so I did not arrive until an hour before the show. While I had more than enough time to set up (because I practiced and photographed how I wanted it to go the day before) my neighbors were there an hour before me and took the opportunity to do what happened to me in the prior point I made.
  • Don't make your table too neat and tidy. I set my table up very clean, not overly cluttered, and lots of white space. As if I were designing marketing materials or something, I love my white space. Don't do it. I read all of the information I came across about doing a craft fair and I put them into action. I made different levels for varying heights and I tried not to have anything just lying flat on the table. Within an hour I was pulling things out of baskets and scattering them around the table. As soon as I did that they got noticed, go figure. Now it bothered the heck out of me true, but maybe my table just had too much white space. 
  • If I had the time, or money, I would have had a larger sign that hung down the front of my table instead of using up table space. For one, my sign was a little small (but it was what I could afford and could still do the trick). Two, it took up valuable table space. You never know when you have to adjust your set up plan (see point numero two). I could have really used that space for a check out area. Also a good point. I read that you should have a check out area a hundred times so I brought a TV dinner table to set up a station behind my table for bagging and running credit cards. It didn't work nearly as well as I had hoped. It really needs to be right at the end of one of your tables (in this situation it wouldn't have worked because my 10 foot space I paid for was really only 7 tops). When people wanted to purchase something they brought it over and laid it down on top of other things on my table because there was no place else to conveniently do the transaction.
  • Get yourself some bed risers. I noticed that most people came through and leaned over to look at the merchandise (my hallway apparently was a little dark as well). For my next go around I thought that if I make my tables a little taller, using 4 inch bed risers, that everything would be closer to eye level and folks wouldn't have to lean down to look at everything. Also, I won't have to worry as much about things left lying flat on the table instead of in a display. It seems like I good idea, I will let you know how it works out. 
  • Lastly, make bigger signs for your merchandise. In the interest of time I used all of these chalkboard clips that I wrote the prices on for each little display. It seemed like a good idea at the time but they were worthless. Now I knew what they said but even I could barely read them after I got all set up. I think that was another big mistake. I did individually tag most of my items as well but the one thing I will do differently next time is make larger, bolder, signs to  name what the item is in each of the displays.
All in all I had some set backs, it is a learning curve for sure, but I still sold 3.2 times my booth fee and I hear that's good. My gut is telling me that had I not had the location issue it would have been a lot better. 

Happy crafting!
-Sherry

Oct 26, 2017

Craft Fair Series 2017 + Free Printable

I decided to jump on the bandwagon to do some quick popcorn sleeves. All of the examples I have seen seem to use the same printable that has been floating around on the internet for some time now, so I decided to make my own printable. Isn't it cute?
Snowman Free Printable
I printed two on one sheet of card stock, with no wasted paper at all. They were a perfect fit. The basket is filled with kid's size gloves and on the table are the adult size gloves. In my opinion, the soft fuzzy gloves shown above are perfect for this project. They slip nicely over the popcorn packet, and they look the best decorated.
Snowman Face Free Printable
Print out the page, cut at 5.5 inches, lightly score (on the front side) at 2.25 inches and again at 6 inches (for a full size popcorn bag). I don't burnish my score line, I just used it as a guide to lightly bend at that location to wrap around my popcorn packet. I used sticky strip tape to secure. Put both gloves on hand and remove together, then slip it over the top of your wrapped packet and decorate as you wish.

Happy crafting!
-Sherry

Oct 17, 2017

Craft Fair Series 2017 + Tea Light Jar Snowman

I feel very neglectful. It has been a little over a week since I have had time to check in with ya'll. I'm telling you, this craft fair business is very time consuming when you do it last minute. Today I have just a quick show and tell peek at some nifty little tea light snowman jars.
Did you spot my two little blue and orange Denver Broncos buddies? No time for a tutorial today but If you would like me to put one together when I get through this craft fair just leave me a request in the comments below. Also, stay tuned tomorrow for a DIY business card holder I put together. Here's a hint, it's not made of paper!

Happy crafting!
-Sherry

Oct 9, 2017

Craft Fair Series 2017 + Washi Tape Magnets

Come on we all have it. That little stash of washi tape in the bottom drawer that you are hoarding. Well I found a perfectly cute use for them. Washi tape magnets. Magnet, washi, put it together, and ta-done!
This may be an item that ends up being a little more crafter specific, but hey, I loved them so they are going to the fair.
Now, I can not recommend enough that you use the flat strips of magnets (which were perfect by the way). You get 18 in a pack, cut in half, now you have 36 washi magnets for $2. Here is why: I was sorting through stash bins and found a roll of the magnetic tape that was the same width as the strips I had been using so I figured let's use it up, not so much. Worked fine except because it was on a roll, I have been spending way too much time trying to keep those strips flat. The ones from the pack sit perfectly flat, perfectly fine.
The ones I made from the roll do hold their shape flat when stuck to the fridge but as soon as I packaged them you could see the difference. They have a slight bend to them and it is driving me crazy. Well, waste not want not. These are so darn cute, if they don't sell I won't be heart broken. I have a fridge calling for them as we speak.

Happy crafting!
-Sherry

Oct 5, 2017

Craft Fair Series 2017 + Altered Journal Packaging Idea

I finally resolved my packaging dilemma for the altered journals. I made a vellum belly band to have something that I could attach my trusty removable glue dots to. I wanted to be able to secure the pen and bookmark so that they didn't slide around inside the package.
I gave in and bought a package of 9 x 12 inch cello bags that I slid the set into and secured. I used some white tulle to make a fluffy bow. I like to use tulle on packaging because it will stay fluffy and keep its shape in transit.
I cut two tags from scrap white card stock and left over matching designer paper. I made one a removable tag with the price and my angel stamp, and one additional blank tag for gift giving.
Done and done, I'm checking it off my list. These are all packaged and ready to go. On to the next project. Whew, craft fairs are sure a lot of work when you decide to jump into one 6 weeks before the date. (In the interest of time that I don't currently have, please forgive my photographing skills and messy desk today.)


Have a fabulous day, and happy crafting!
-Sherry

Oct 3, 2017

Craft Fair Series 2017 + Altered Journal Tutorial

My project today involved a simple school composition book. I thought this would be a great project to use up some of my retired designer paper that I love.
Crafted Charm Altered Book
Many of you have asked for instructions so I put together just a really simple tutorial. I will also say... do as I say not as I did! Measure, measure, measure EACH book. Even though I knew better, I measured one and cut all of my designer paper to the same measurements for each of my books. Shame on me, but there are no mistakes in crafting right? Right, so instead you make a border to cover the short side. I will say, that's what I did on my first one but ended up liking the pattern being broken up so I just continued it for the rest of my designs whether it needed it or not. Also, be prepared to sacrifice 3 to 4, 12 x 12 sheets of designer paper if you are using the full size books like I did.
I used tombow liquid glue to adhere my papers to the covers of the book. I did not go the mod podge route because I was afraid to get a gummy crunchy cover. I don't know if that would happen but I wasn't taking any chances. I also chose the liquid glue over using a tape runner because I wanted the extra play time to make sure I was lined up properly. When gluing make sure you use thin lines and get to the edge for a nice seamless covering. My tombow worked like a charm. I rounded my corners after I glued the paper down so I could just follow the line that was already there.
I used a nail file to smooth the edges and trimmed any other overhang following my scissors along the edge.
I covered the inside of the book as well with coordinating paper. I like to leave a small gap at the inside. Assuming that if the product is in use, the cover would be opened and closed regularly. I didn't want it to be jammed into the crease and bunch up.
I had all of these pieces of designer paper left after I cut the covers so I put them to use.
I made a pocket for the inside cover. It measures 6 x 4.5 inches. I certainly had enough pieces I could have added more pockets, I just chose to keep it clean. If you add a pocket it can be really any size you want it to be. Perfect way to use up cut papers. This pocket was perfect for holding the bookmark I made next.
Then I took a 2 x 6 inch piece and cut some scrap card stock to the same size to make a coordinating bookmark. This vinyl bookmark sleeve is just fantastic, it gives a really nice finish to a simple bookmark and it makes it durable and long lasting. I have been making quite a few lately but I do have a product share on them. Unfortunately you have to generally buy them in bulk, and not everyone wants to make 100 bookmarks, so I try to break it down to smaller lots for my customers. You can check them out on the product share page.
The final thing I did with some of the leftover paper was to make a matching pen. I only use Pentel RSVP pens because they open up so nicely to slip in the pretty paper. I cut my paper strips to 3.75 by .75 inches. Really then it's just a matter of breaking down the fibers enough to get it to roll. I use my bone folder to help break it down and when I have a thicker paper I will also mist it to get it more pliable. Once I get it rolled I like to glue the edge. It is totally not necessary, I'm just OCD about it slightly unwinding once you put it in the barrel and then all I can see is an uneven seam. I'm pretty sure that I am the only one in the world to see it though.
At this point it's just a matter of embellish away! I can't say this is entirely a quick craft, but it certainly is easy enough. There are so many ways to design the covers and make other alterations. I think it turned out super cute. I love when I have a good pack of designer paper that has coordinating double sided sheets like I had for this project. I got 4 designs from 2 pages that were all the same colors so it made designing easy. My hardest choice was the darn sentiment.
Crafted Charm Altered Book Tutorial
Crafted Charm Bookmark DIY
Crafted Charm Designer Pen DIY
I hope this was helpful for you but now here is my personal dilemma, I plan an bringing these with me to this year's craft fair but I have no clue how I'm going to package them. They do measure in total 9.75 x 7.5 inches. If anyone has any crafty ideas on how I can package these please leave me a comment below. The struggle is real people!

Happy crafting,
-Sherry

It appears that my Facebook Friends missed the September prize patrol that was posted on the Crafted Charm Facebook page. Please stay posted for the October announcement, I would hate to keep all my goodies 2 months in a row! Make sure you are subscribed to the Crafted Charm's Really Awesome Newsletter so you don't miss it.

Copyright and Disclaimer

All images are the sole property of Sherry Espinoza unless otherwise stated. All content is the sole responsibility of Sherry Espinoza. When sharing information from this blog you must credit Sherry Espinoza at mycraftedcharm.com
Powered by Blogger.